
Garter
Using a little lace that I ordered from Etsy, some $1 bargain bin blue ribbon, a pair of cheap rhinestone earrings from Charlotte Russe that I deconstructed, elastic, and a little sewing, I threw together a garter for about $10.


Accent Pillows
In what was obviously a non-wedding-related project, I used some remnant blue silk taffeta to throw together a couple of accent pillows.


Wedding Cake Topper
Little wooden peg dolls seems to be in the in thing in wedding cake toppers these days. There are a handful of Etsy sellers that make personalized ones, chief among them Naked Peggies . They cost somewhere in the neighborhood of $60-$75. Because I love a good trend and it seemed within my realm of artistic abilities, I made one myself. Naked Peggies sells unpainted couples for $3 (or at least she did, as she doesn't seem to anymore), and I picked up a little round wooden box from Michael's for $1 that I used as a pedestal. Otherwise, I just used some acrylic paints that I had around, glitter, wood glue, a tidge of mod podge, and some scrap fabric and ribbon. In all, it cost me maybe $7, and I honestly get a little giddy every time I look at it. In case you're wondering, it's based on dress #2, when I will actually be wearing dress #3 down the aisle. Oh, well.


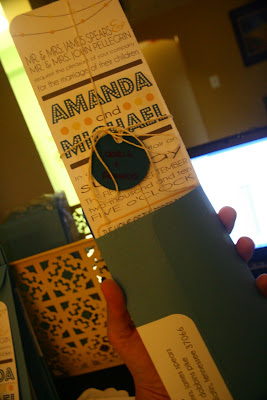
Invitations
The invitations have really been what has taken up the majority of my time. To anyone thinking of doing their own invitations, I would warn that it takes a lot of time, and while you may convince yourself that you could save 80 or 90% of the cost of ordering them, you're wrong. You will save some money, but it won't be an overwhelming amount, so you should really be in love with your DIY version to make it worth it.
I began by designing them in the same way that I designed the save-the-dates. Then I printed them out on card stock.

I opted to forgo an inner envelope, and instead used some baker's twine (from Etsy seller Whisker Graphics) with a little paper disk to serve the same function of personalizing the invitation.


Using a handy paper cutter, I cut out each invitation, RSVP postcard, accommodations insert, and envelope label.

Then I rounded every corner (because I just had to have rounded corners...)...all like 2,000 of them!

Then, I assembled them.

Finally, I stuffed and addressed them--utilizing a tip that I read somewhere to number the RSVP postcards in case folks mail them back without having written the name in. And yes, addressing wedding invitations is just about as much fun as it sounds like it is.


Now, they're all ready to be shipped out this week. So exciting!

I love all the stuff! The garter is gorgeous!
ReplyDeleteI pretty much think every single thing you just showed us is incredible! You are soo artsy girl. The cake topper is so cute. And I love pete making good use of the new chair and pillow. Those invites sound like they took a million hours, ick.
ReplyDeletep.s. i will totally see you in like two weeks, showers are the best part of getting married! ha!
I can't believe you did those invitations yourself!! They are amazing!
ReplyDeleteand how about a post one your wedding party? i dont even know who your girls are and which of the guys are in it??
ReplyDelete