
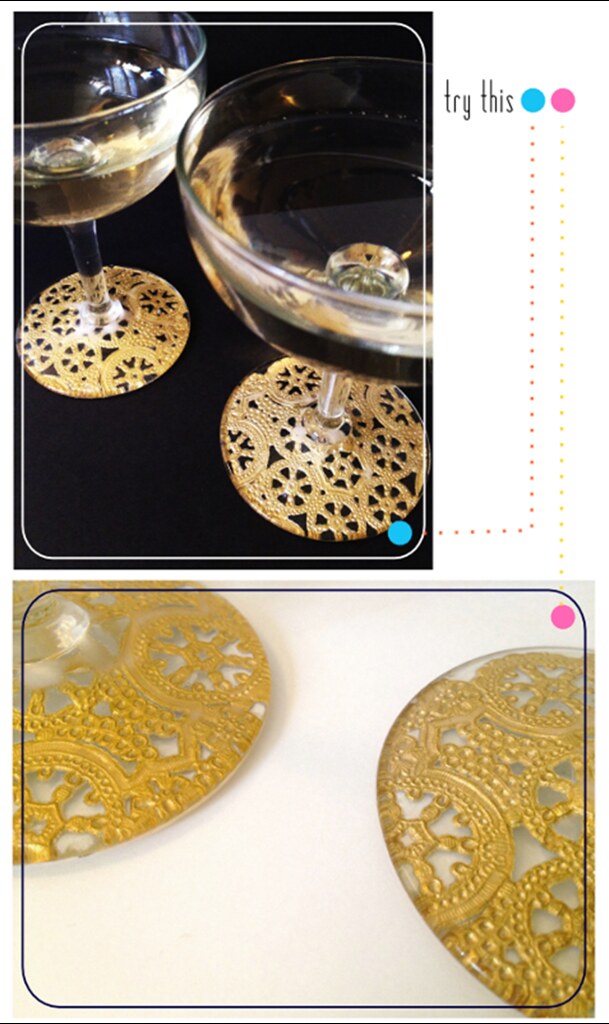
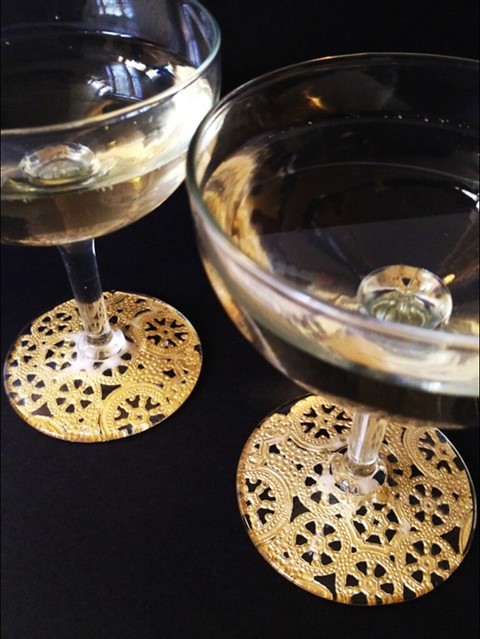
I recently picked up a couple of champagne coupes from a local thrift store for a buck a piece. These glasses instantly make me think of America’s Prohibition, speakeasies, and the 1930s (yes, I have been watching Boardwalk Empire), so naturally, I wanted to make them even more glamorous. What better way to do that than with gold lace?! This project is as about as easy as they come (if you have a little patience) and makes a huge impact on plain stemware.
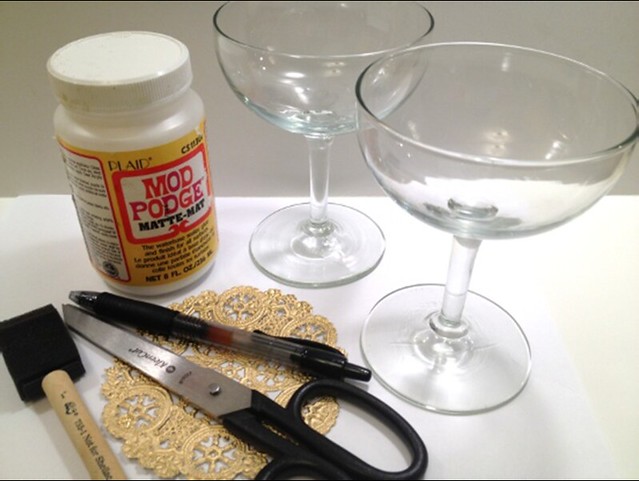
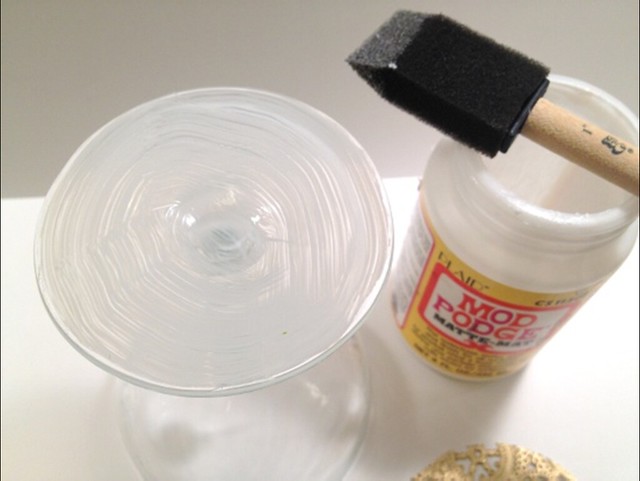
Materials: Glass Stemware, Gold Paper Doilies, Matte Sealer Glue (like Mod Podge), Sponge Brush, Pen, Scissors
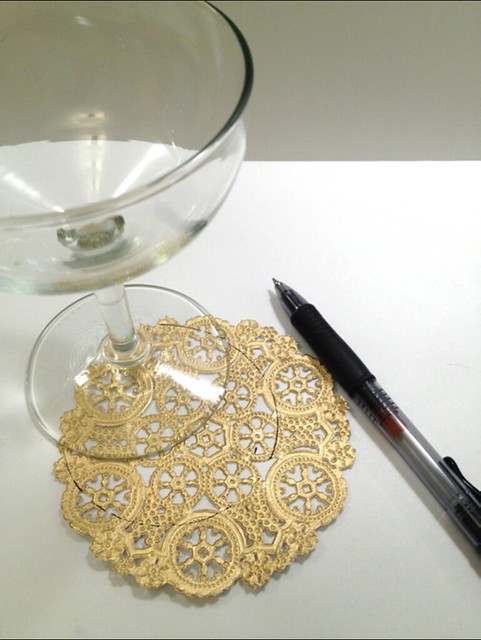
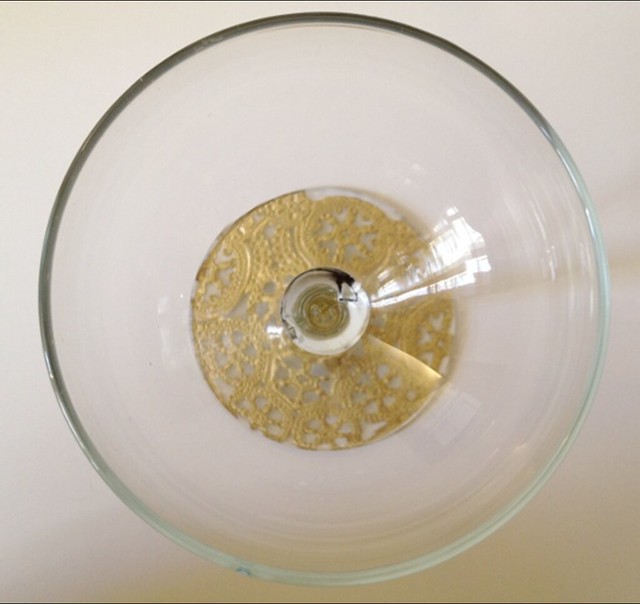
DIRECTIONS: Begin by tracing the outline of the bottom of your stemware onto a gold paper doily. I got these particular doilies from Etsy seller Knot & Bow, and they’re beautiful! I traced mine off center to capture more of the variety in the doily’s detail.
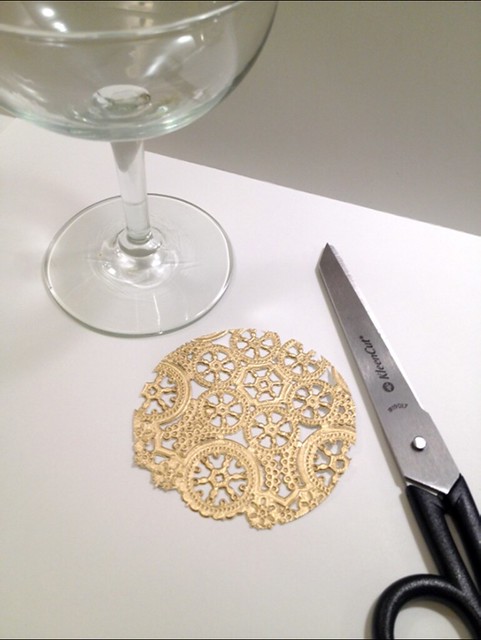
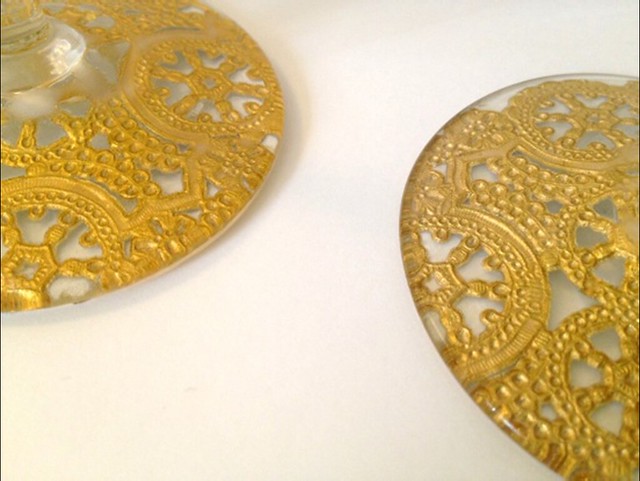
Carefully cut out your doily circle just inside the line that you traced.
Turn your glass upside down, and use your sponge brush to cover the bottom with a thin layer of glue.
Place the doily cutout gold-side-down on top of the glue. Gently press it down so that it conforms to the contours of the glass’ bottom. This may take a few minutes, but just continue gently manipulating the doily until it’s smooth with the glass’ surface. Allow to dry.
Once dry, cover with a thin layer of glue.
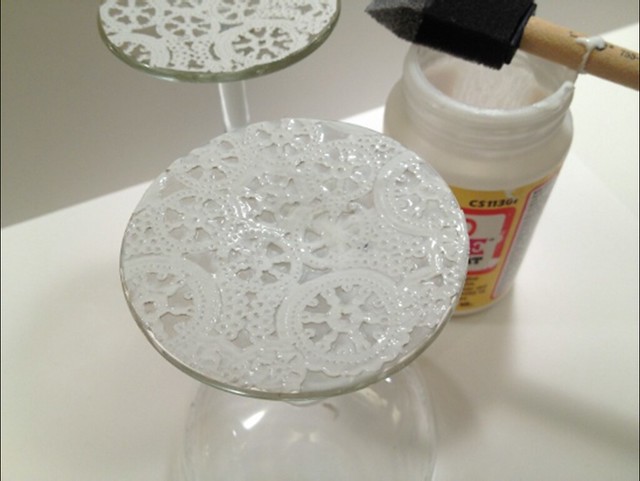
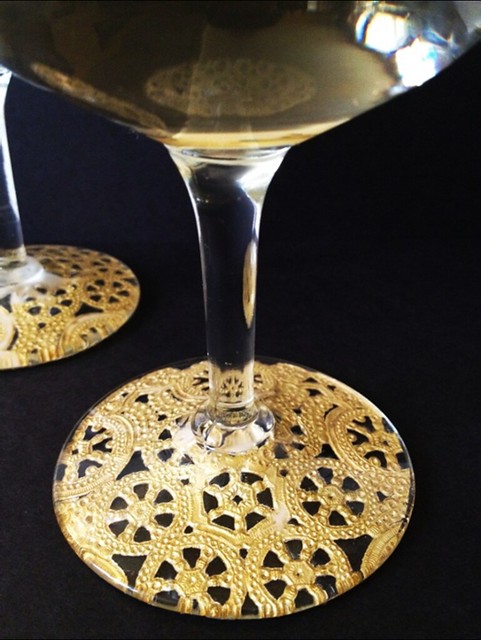
Take a quick swipe around the edge of the glass to clean off any excess glue. Allow to dry. All in all, you’ll probably want to repeat these last two steps 2 or 3 times, allowing each layer to dry before applying the next. This might actually take a few days, but be patient, always allowing to dry so that the glue ends up clear. You want the doily to be the star here, not the glue. Be sure to quickly rinse out your brush after each layer so it doesn’t harden. You’ll know you’re done layering when you can just barely feel the texture of the doily through the glue on the bottom.

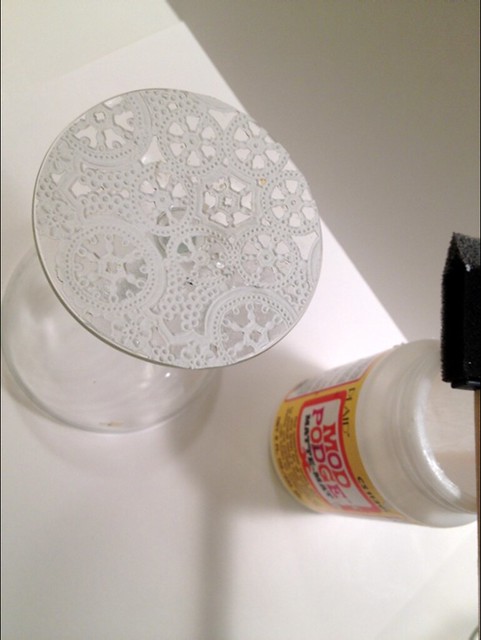
Speaking of glue, this is what the first layer of glue will look like from the top. Don’t be concerned. If you give it time to dry before applying the next layer, this will all dry clear.
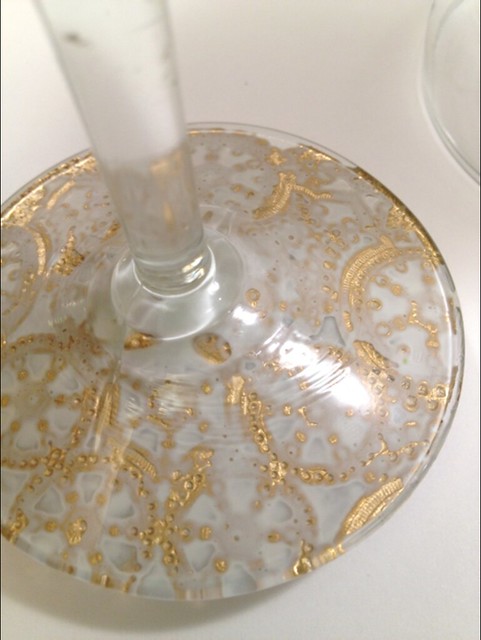
Once you’ve patiently waited, layered, waited, and layered again, you’ll end up with a set of oh-so-glamorous, one-of-a-kind stemware. I’m putting you on notice now, though, that these glasses may result in increased alcohol consumption (unless you’re like my mom, who insists that ginger ale tastes better from a wine glass.). Enjoy!
If you do give this tutorial a try, please be sure and share a picture through the "Share Your Projects" link at the top of the blog page. I'd love to feature some!

Note: This glue is a sealant so they are safe to wash, but be gentle and hand wash. If you’re particularly concerned about the longevity of the finish, the glue bottle suggests using an acrylic sealer on top of your final coat.

find me elsewhere
If you've ever given one of my tutorials or cocktails a try or you've just been inspired by something you've seen here on Fabric Paper Glue, be sure to share a photo. I'd love to feature it!
I LOVE IT! Fantastic idea, Mandy. There are a million of these at my local goodwill.
ReplyDelete*Joce
Love this idea! Nate picked up some regular glasses lined with silver (that match our china) at a thrift store. There aren't enough to match our place settings but this would be a great way to suppliment or mix and match with glasses, in the event that we actually have 8 people over when we use our china...
ReplyDeleteGreat! I also have these doilies in silver. If you carry through, you'll have to share the results!
Deletethey look great! but i'm a sucker for anything gold.
ReplyDeleteOh, me too! I'd spray paint my whole house gold if I could! ...or at the very least dip the bottom half of everything in gold.
Deletewhat a genius idea!! I love it!
ReplyDeleteIt's my golden birthday next week, and guess who found a new craft project?! :) Thank you!
ReplyDeletewhat a cute idea!!
ReplyDeleteLove this idea! Brilliant! What a fun blog, thank you so much for sharing!
ReplyDeleteCheers!
Cyndy
These are so beautiful! I found you through Pinterest...and I'm glad I did. :) Megan
ReplyDeleteLove this idea, am going to try it with several different colors of doilies to make a set of glasses for parties so we don't need to use stem gems.
ReplyDeleteVery Cool!
ReplyDeleteMake sure you find glasses with flat bottoms. My glasses had concave bottoms and the second layer of glue pooled in the bottom and didn't try clear. Have to start over again!
ReplyDeleteOh, no! How long did you let it dry? Mine also had concave bottoms, and there was definitely some pooling. It took a good week or more for all the glue to dry and be clear all the way through, so don't throw yours out just yet. Just give it some extra time.
DeleteI did the second layer last night and saw the pooling this morning. Since the first layer dried clear in a few hours, I thought it would take the same amount of time, but I will let them sit for another few days. I'm so happy to hear I don't have to toss mine! It's a Christmas miracle : ) Thanks so much for your feedback.
ReplyDeleteWhat a cool idea! I have a bunch of old wine glasses that could use some jazzing up! Might give it a try with some silver doilies too!
ReplyDeleteI am going to add gold doilies to my already styled 50th class reunion table decorations!!! I think it would show nice on the mirrors under each one. pics in August-not wanting anyone to see the whole thing yet!!!
ReplyDeleteLove this, so fancy. I've shared this awesome craft over at Cafemom in my group Holiday and Party Crafts. Our mom's are going to love this.
ReplyDeleteThese look amazing. I might try it with my WIne Glasses though! Yours def give a 30's vibe.
ReplyDeleteOooh, I love this! I almost want to try it with every glass I own, wine, champagne, water, and otherwise. :P
ReplyDelete- Esther
http://estherkimcotton.com
Haha. I know. But do them in stages or you won't have anything to drink out of for a few days while the glue dries.
DeleteHow beautiful!
ReplyDeletexoxo
Mags
http://magsmind22.blogspot.com/
Thank you!
DeleteWhat an brilliant idea!!!!!
ReplyDeleteWhy, thank you!
DeleteGreat idea! Who doesn't like Champagne, in these glasses!? Caroline
ReplyDeleteThis is such a great idea!
ReplyDeletethis is so chic and classy! i think i might try this soon!!!
ReplyDeleteWonderful creation I need some more glass tutorial like this. To stick the design you use some Instant adhesive because it can easily stick within a second.
ReplyDeleteI tried something similar in terms of mod podge on glass. I mod podged doilies to a window with the doilies being on the backside of the window so you look through the window to see them. The glue did not dry clear. It darkened the fabric. any ideas? The doilies were fabric so maybe that is the difference.
ReplyDeleteSorry to hear that, Allison! I would imagine the darkening happened because it is fabric -- in the same way fabric would get darker if you dipped it in water. However, Mod Podge makes a formula specifically for fabric. You should check out this guide that they have that shows which formula to use for different kinds of projects/materials: http://www.plaidonline.com/eduPDF/MP_Formula_Guide.pdf. Also, how long has it been since you did this? It literally took like a week or more before my glue got totally clear.
DeleteIt's a stunning idea!! I am wondering if it is water-resistant after dried mod-podge for few times?
ReplyDeleteThanks for sharing this post with us...nice work...cyanoacrylate
ReplyDelete.
Thanks for sharing this post with us...nice and use full article...Super Glue or Cyanoacrylate.
ReplyDeletehey! at the bottom of your post I was trying to use your social media icons but your pin it code has overwritten it and I cant access them! I love this DIY ^_^
ReplyDeleteA very genius idea! Thank you so much for sharing. I would like to try this, too, on personalized stemless wine glasses.
ReplyDelete