
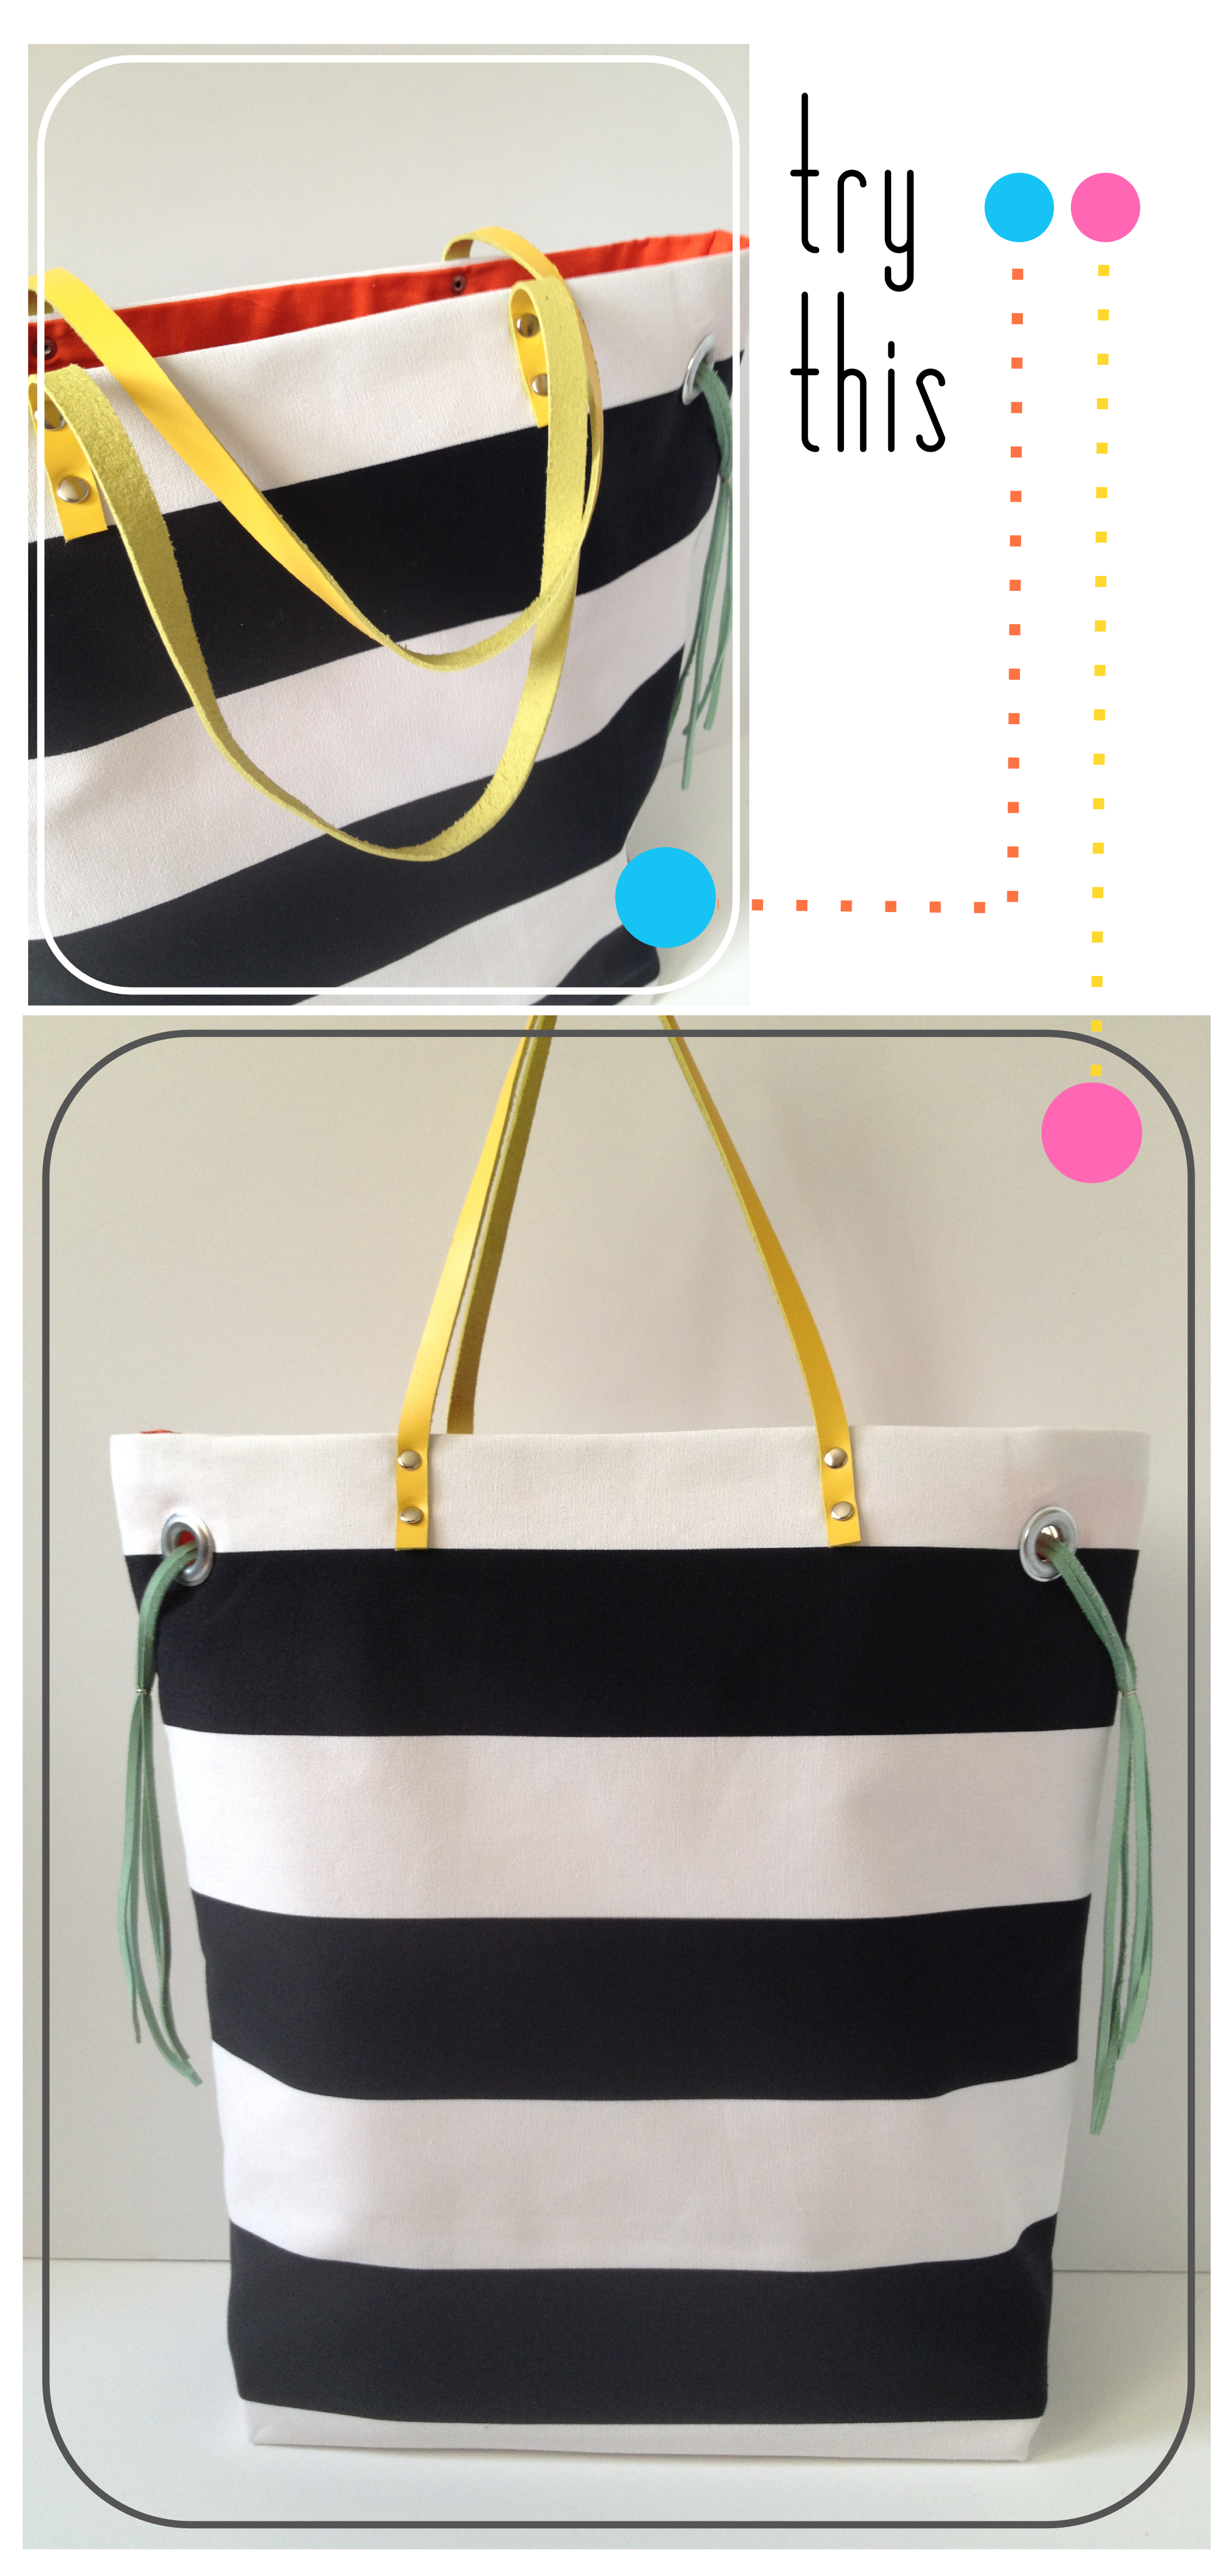
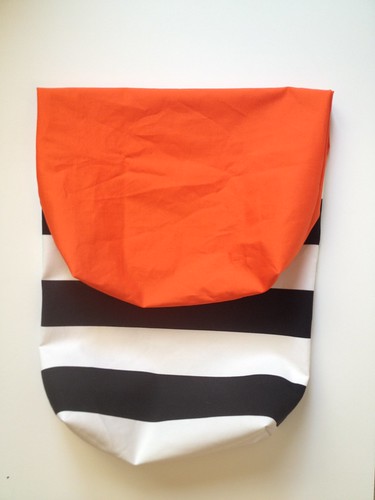
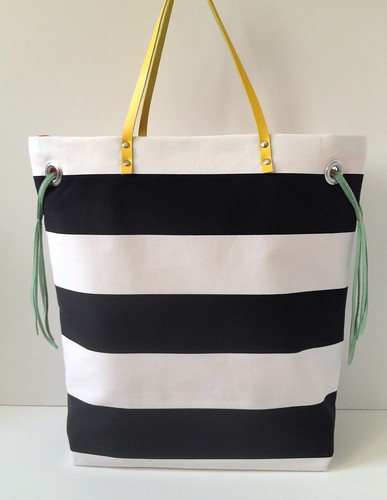
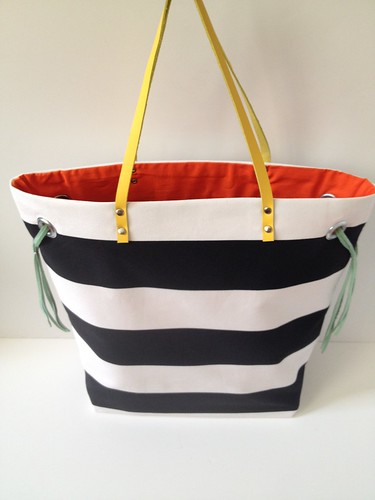
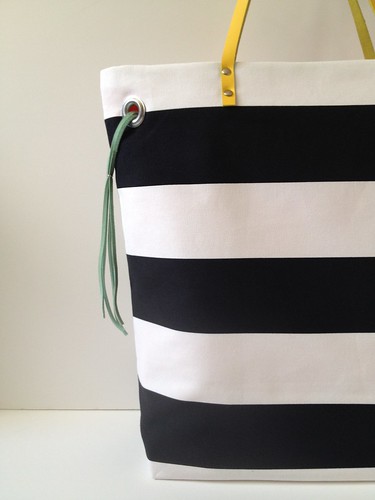
Try This: Stripes + Color Tote Bag
I'm in love with this project. It looks really advanced, but the sewing itself is absolutely basic. It does apply some techniques like rivets and grommet that I hadn't actually used before this project, and I can assure you that you shouldn't be intimidated by them. In fact, they were so easy that my head is sort of twirling with ideas of other projects on which I can put these bad boys to use.
Before you get started, I would also note that you don't have to use a striped fabric like this one, but using a big bold black and white pattern will give the colored details a special little pop that makes the bag unique.
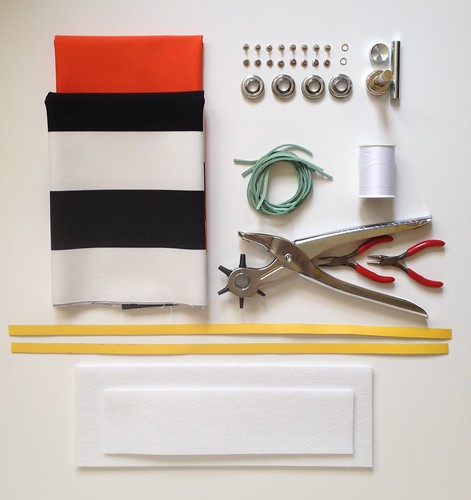
Materials:
4 - Large Grommets (and installation tools)*
8 - Small Rivets (and installation tools)*
Hammer
Hole Punch
4 - 18" Leather Laces
2 - 18" x 1/2" Leather Straps**
2 - Jewelry Jump Ring (or other small metal rings)
Pliers
Thread
Sewing Machine
2 - 16" x 17.5" cuts of a heavy canvas-like Bold Striped Fabric (with the stripes running parallel to the shorter side)
2 - 16" x 17.5" cuts of a Bright Solid Fabric for the lining
1 - 13" x 9.5" cut of the the Bright Solid Fabric
3 - 4" x 12" cuts of Super Heavy Interfacing
2 - 2.5" x 10" cuts of Super Heavy Interfacing
*Most grommets come with the installation tools you'll need for them (except for a hammer). For the rivets, you can buy a starter kit (like this one) that includes a variety of rivet sizes and the tools you'll need to set them (again, except for a hammer).
**Unfortunately, I don't have a home run source for brightly colored leather strapping. I ordered mine from Etsy seller all 4 handmade, but I wish they'd offered the bright colors in wider straps.
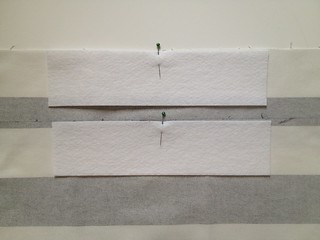
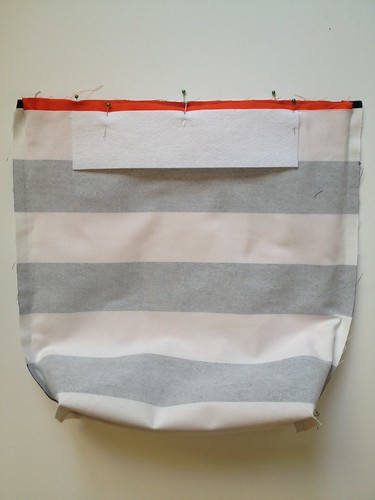
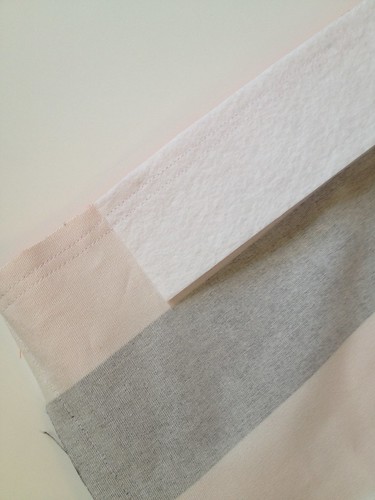
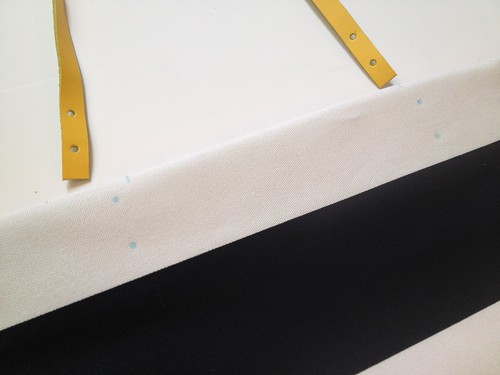
Directions: Center, pin, and stitch each of the 2.5" x 10" cuts of heavy interfacing to the top, back edge of each of the cuts of striped fabric.
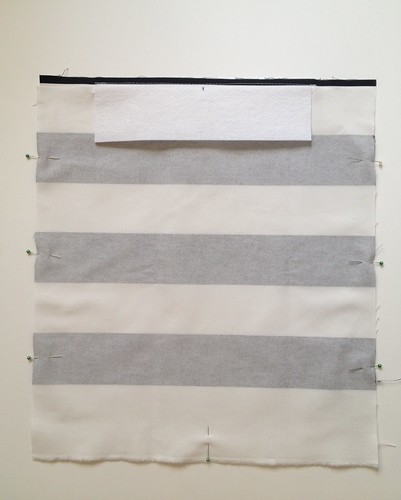
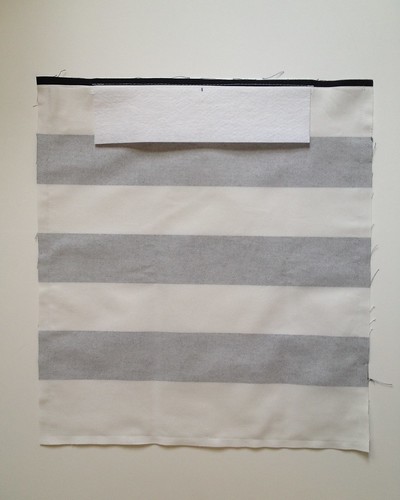
Pin the two cuts of striped fabric together with the right sides facing one another. The top edge with the heavy interfacing will be the bag's opening. Sew around each of the bag's other three edges.
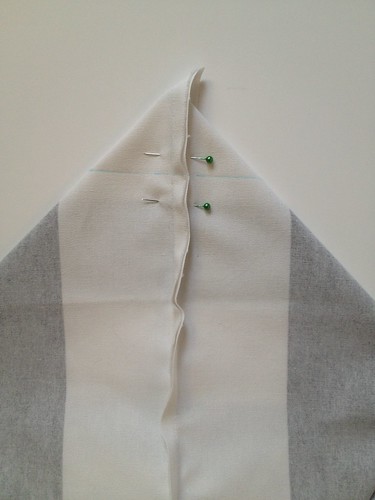
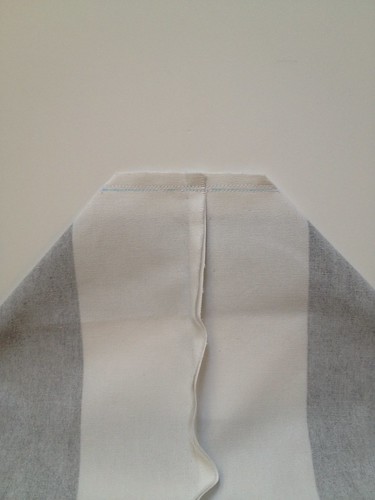
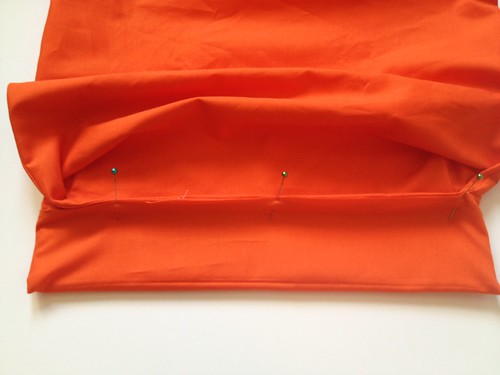
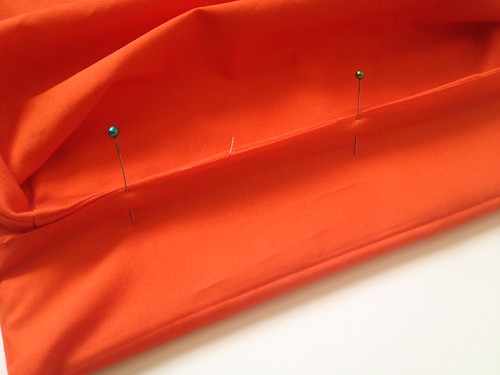
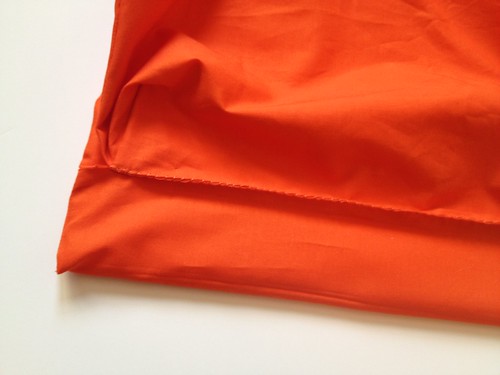
Box the corners to give the bag some shape by forming a triangle at the corner edge such that the bottom and side seams are touching. Mark a line perpendicular to the seams about 3" from the corner. Stitch on this line and trim the excess fabric.
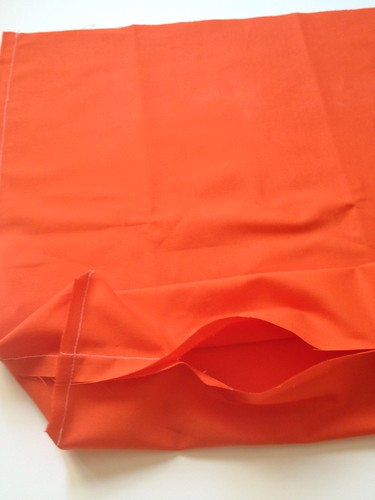
With the exception of the first step involving the heavy interfacing, repeat these steps with the lining fabric, but leave a hole about 3" wide in the bottom seam to pull the bag right-side-out once you've stitched everything together.
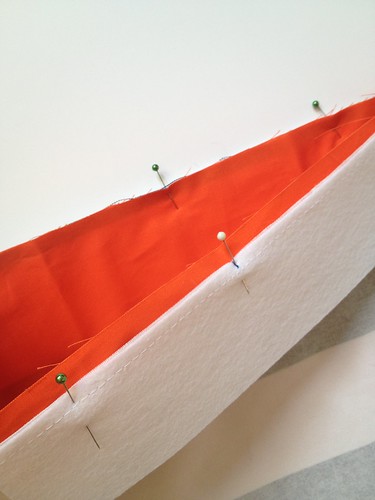
Place the lining inside of the outer bag. The right sides of both components should be facing one another. Pin and double stitch them together around the top.
Pull everything through the hole you left in the lining.
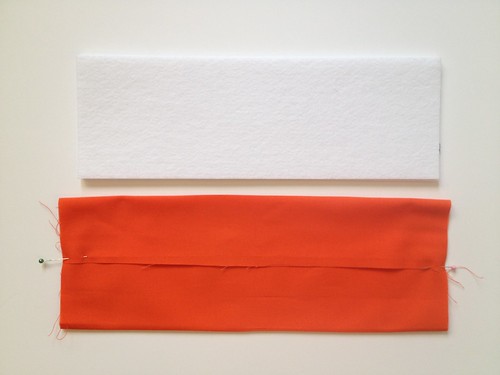

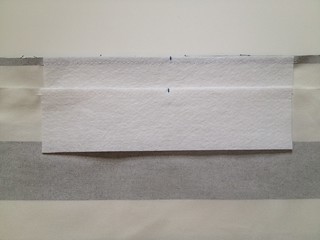
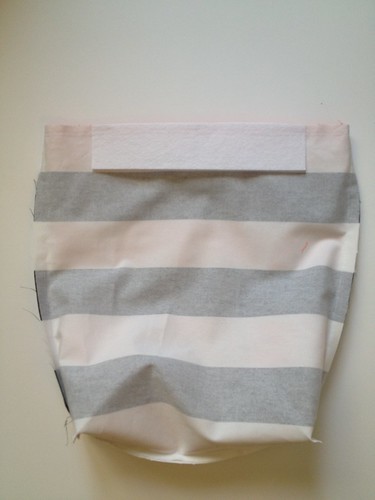
To give the bottom stability, create a panel to attach to the bag's lining. To do this, take the 13" x 9.5" cut of lining fabric and fold it into thirds such that it ends up being 4" wide like the remaining heavy interface pieces and the fabric overlap is centered (see photos). Stitch along the two outside edges.
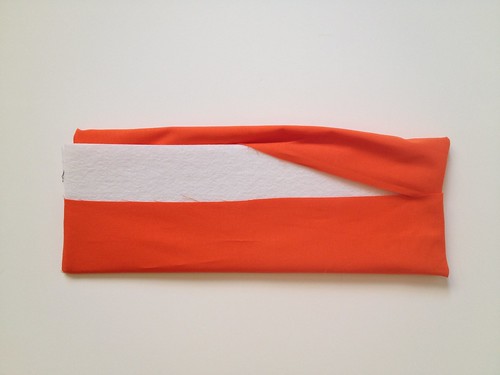
Turn the piece right side out, and slip in the remaining 4" x 12" interface pieces.
Take the edges of the opening of this bottom piece and pin them to the bottom seam of the bag's lining. Stitch together. I did this step by hand, but feel free to do it on the machine if you can maneuver it.
Now tuck the lining in the bag, and press.
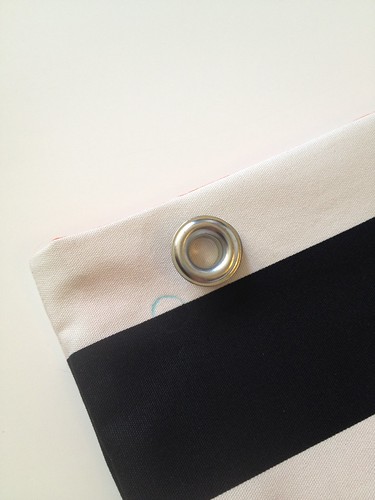
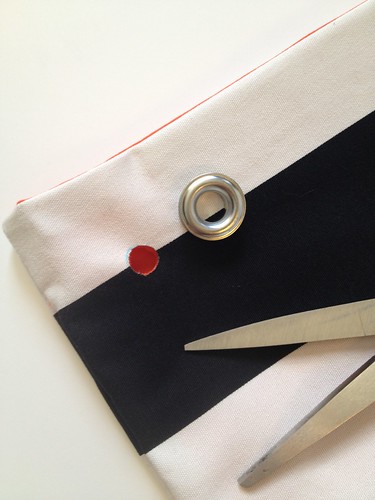
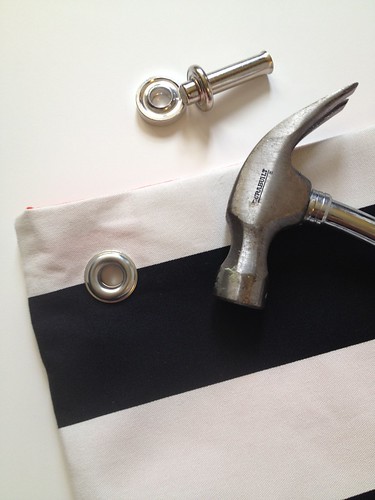
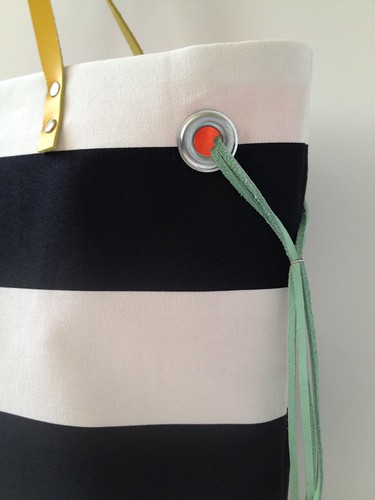
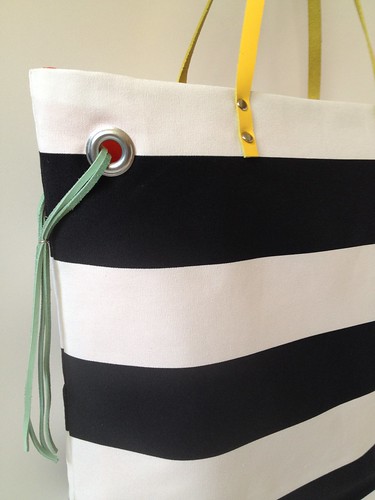
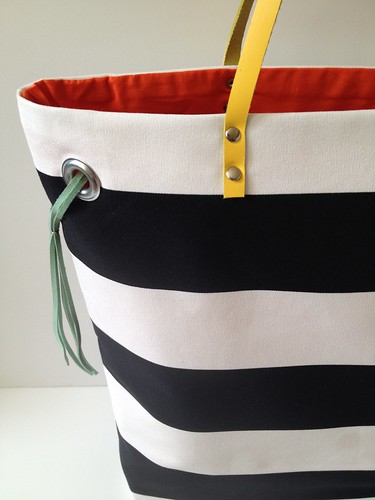
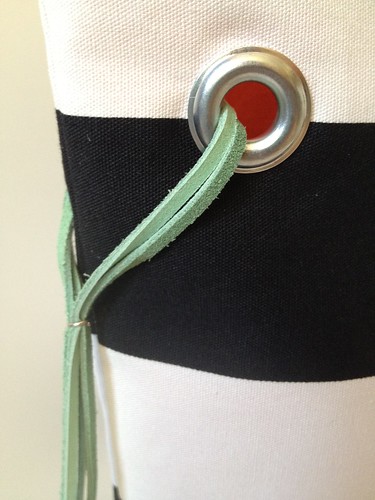
On one side of the bag, position one of the grommets about an 1.5" from the top and side. Trace the inside of the grommet onto the bag and cut out. Install the grommet according to the directions on the packaging. You're doing this just for a single side. Do not combine the two sides of the purse with the grommet. Like I said, this was the first time I've worked with grommets, and at first, I thought I was doing it wrong because it didn't seem to be working. Just know that it took about 50 good whacks of the hammer for each grommet.
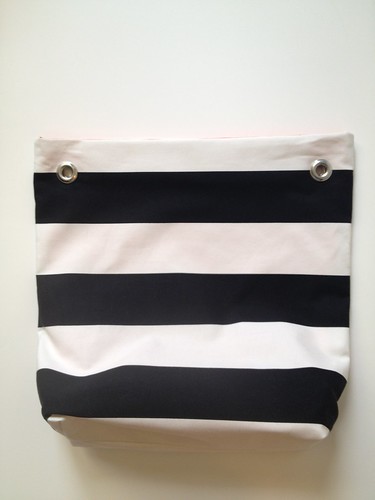
Repeat in the the other corner and on each corner on the opposite side.

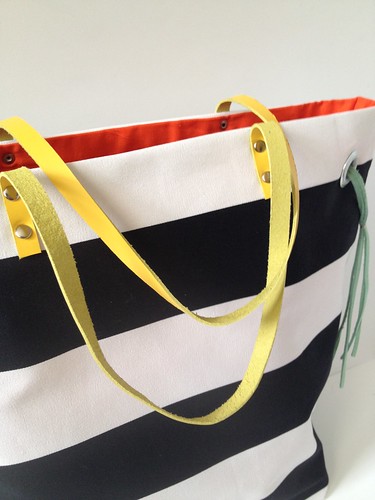
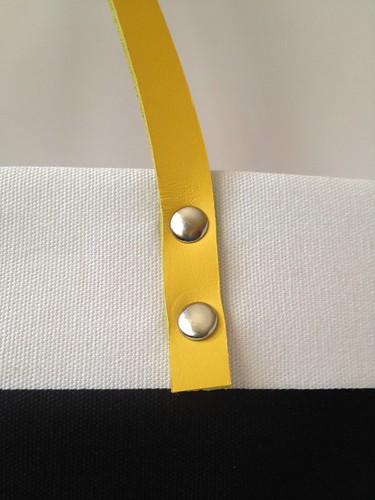
On each end of the 1/2" wide leather straps, punch two holes just big enough for the rivet to slip through. The bottom hole on each end should be about a 1/2" from the edge with the next one about 1" from the edge.
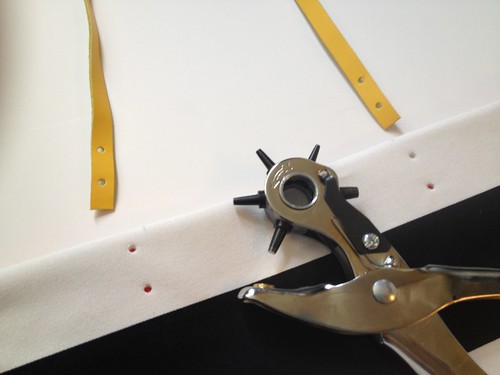

On each side of the bag, position the strap ends about 3" from the bag's center point, and place a mark where the holes in your strap ends are. You should be able to use your same hole punch to punch these holes in the fabric. The rivets that you use should only be about as long as the thickness of the fabric + straps together. Install the rivets according to the directions with your installation kit. I also watched this video, which I found really helpful. These are super easy to install and only take about 2 to 3 whacks of the hammer.
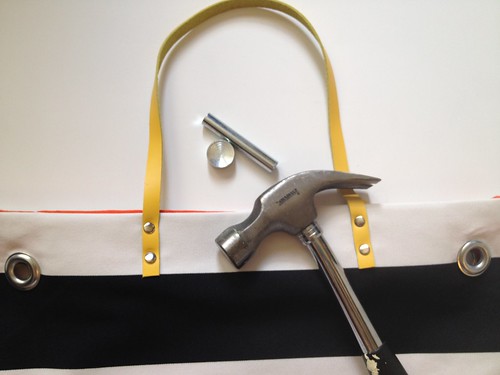
Repeat the strap/rivet installation process on the other side of the bag.
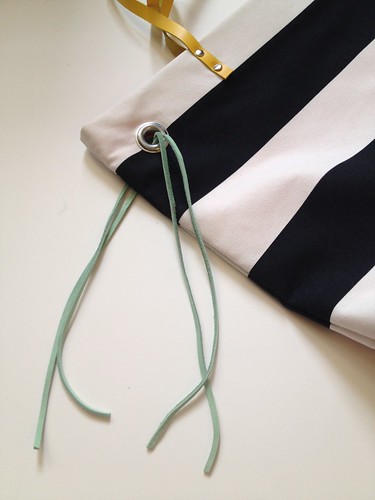

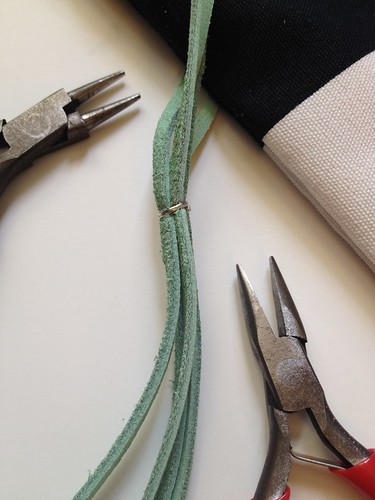
On each side of the bag, thread 2 of the leather laces through the grommets you installed earlier. Join them together using a small metal jewelry jump ring. Separate the ring with a set of pliers, install it around the two laces, and squeeze it tight around the leather. Repeat on the other side.
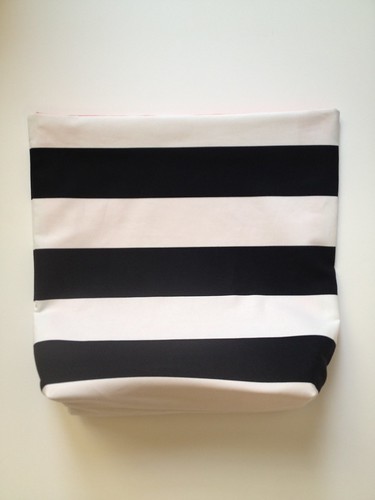
Now, your bag is complete!
As I do with many of my craft projects, I gifted this to my friend René. Like I told her, I'm not totally confident how much load these leather straps can handle. So far, I've not heard complaints, but I don't think I'd recommend using a 1/2" wide strap if you're going to be using this for heavy books and the like. In those cases, try a wider strap.

find me elsewhere
i love this!! though i am seriously doubting your description of "absolutely basic" sewing. but, it's pretty awesome so maybe i'll gather the courage (and supplies) to make my own.
ReplyDeleteCan't I just buy this one? I don't know how to sew. I love it.
ReplyDeleteI will keep that in mind, Sarah, for any future gifts. :)
DeleteTotally just pinned this to remind myself i NEEEDDDD to make this. Why is it that everything has to be pinned or I won't remember it?? But seriously. Freakin adorable. I'd pay big money for this.
ReplyDeleteYES! I have so many blogs in my reader, pinning is the only sure fire way for me to be able to find something again. So, pin away!
DeleteThis is super cute! It was cool seeing the whole construction process. Thanks for sharing!
ReplyDeleteOMG!! I love that bag! I want it!
ReplyDeleteI promised myself I wouldn't buy any new clothes, shoes, or the like this year to save money but no one said anything about making a bag!! Can't wait to try this. I've been wanting to dive into trying grommets :)
ReplyDeleteLove the little details.
ReplyDeletethis is simply superb. Well done! Love your color choices and leather touches.
ReplyDeleteUmmm... it would not be possible for me to just "try this" and throw together an awesome bag. I lack skills. You are a star.
ReplyDeleteThis is really cute. Great design!!
ReplyDeleteThis bag is functional and trendy!!!!
ReplyDeletenice tutorial
ReplyDeleteI think the stripes on that bag is a sewing but that is real from material design.
One of my grommets got stuck onto the fabric!! What should I do? I'm 99% done, and this happens! :'(
ReplyDeleteI'm not sure I understand. Were you able to get it figured out?
Deletenice tutorial thank you!
ReplyDeleteGreat tutorial - I really love this one - inspired me to start a new pinterest board for DIY bags, that are simple enough for me to attempt:)
ReplyDeleteI do really like yours, but of course I'd like to play with color options here and those leather thingies on the side are an invitation to play even more:) with everything from charms, rocks, shells to survival tools like those key chain lights.
I'm not a sewer so I will do my best to keep it simple, but I do need inner pockets and a zipper closure on all my bags.
Like you said this is one project that toally makes your head spin with the possibilities! Love it!
Hi! I know you say to use large grommets but do you know exactly what size you used? Would 14mm grommets be too large?
ReplyDeleteI think these were more like 9mm grommets. 14mm might look a little big unless you put a few more laces through the hole.
DeleteAwesome, thanks!
DeleteI have another question for you... do you know what size the jump rings were that you used?
DeleteI'm not sure exactly their size, but I think around 1/4" or smaller in diameter. So long as their big enough, you're just using them to squeeze around the laces.
DeleteHey Mandy! This looks like a great project! Where did you get your fabric from?
ReplyDeleteHi, Ashley. Thanks! The striped fabric is from Ikea, but you can find similar ones online (like this one), and the orange fabric is just a cotton that you can pick up from any local fabric store.
DeleteI just made this with black and white chevron. Love it.
ReplyDeleteTori, where did you find the leather pieces?
DeleteVery beautiful and useful, thanks for the tutorial
ReplyDeleteCiao
Norma
beautiful bag! where did you find the leather straps?
ReplyDeleteThanks, Liz. I bought them from this Etsy seller.
DeleteThis is way too cool! Where did you find the leather for the straps and the laces?
ReplyDeleteThanks, Anne. I bought them from this Etsy seller.
DeleteCan I make this without the interfacing?
ReplyDelete