

Yesterday I shared our finished bed. As you'll recall, I devised an extra-wide headboard based on this inspiration to make sense of the low walls and pitched ceilings in our attic bedroom. Today I'm sharing the headboard how-to. Read on for my step-by-step and lots more pics.
In a sentence: The headboard is a number of upholstered 1x8s placed edge-to-edge and framed out with mitered 1x4s. My full supply list included:
From the hardware store:
13 - 1x8s cut to 52" long
2 - 6' long 1x4s
1 - 10' long 1x4
3 - 8' long 1x3s
12 regular mending plates
2 L-shaped mending plates
lots of wood screws
paint
lots and lots of staples
From the fabric/craft store:
5 yards of upholstery fabric
low-loft quilt batting
high-loft quilt batting
spray adhesive
Tools:
electric drill
hand saw
miter box
staple gun
Oh, and a big ole tip about these supplies: 1x8s are not, in fact, 8" wide. They're more like 7", so yeah, remember that. I hadn't realized that whilst making my purchases, but it worked out to be wide enough anyway.

I had each 1x8 cut at the hardware store to 52". I cut both my upholstery fabric and the low-loft batting into strips a couple of inches bigger all the way around than each 1x8, so about 56" long by about 11" wide, and the high loft batting to the same size as my 1x8s or 52" long by about 7" wide.
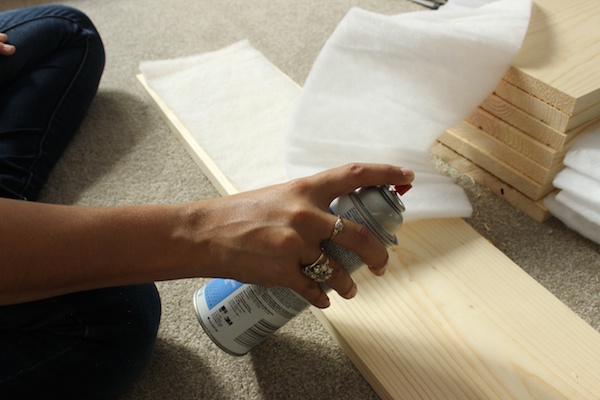
I affixed each strip of high-loft batting to a 1x8 using a bit of spray adhesive. Using a staple or two would be fine too, but I wanted to make sure I kept everything smooth.
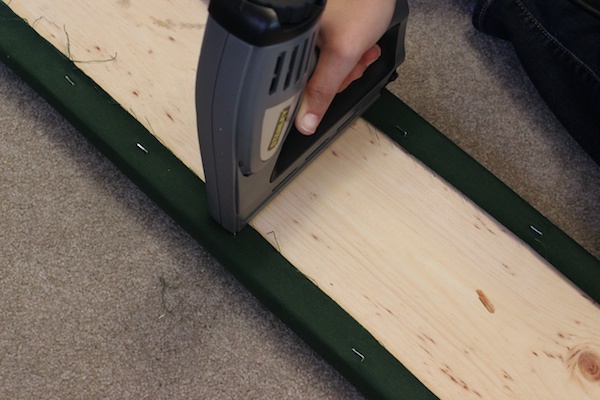
Next, I wrapped each 1x8 in a strip of upholstery fabric layered with a strip of low-loft batting, and stapled my heart out. If you remember the great green chair upholstery debacle of 2012, you'll recall the I almost lost a hand using a manual staple gun, so I was super excited when my dad broke out the electric bad boy you see here. It's pretty much a must-have for a project this big, and apparently, they're not that expensive (see here), which makes me wonder why I've been messing around with my dinky manual one all these years. But I digress... Anyway, the high-loft batting gives some padding, and the addition of a layer of low-loft batting gives a tad more but more so helps to smooth it all out -- including the edges.
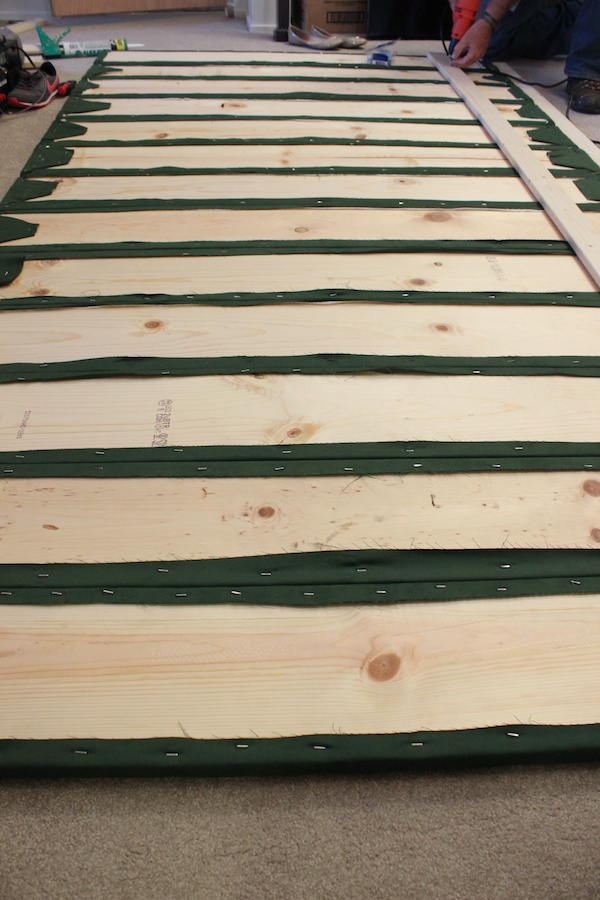
Once they were all upholstered, we laid them edge-to-edge face down on the floor. Now, this is important. Make sure the top edges are all completely in line. Kick the edges against one of your unused 1x4s or 1x3s to get them all perfectly lined up. To attach them to each other, we evenly spaced the three 1x3s along the back and screwed them into the back of the upholstered 1x8s. Make sure you pick out screws that are just shorter than the two boards together. You don't want to poke right through the upholstery...right? Oh, and please disregard all of my shoes strewn about, won't you? To avoid having to try to figure out how to get this monster up the stairs, we built it in our bedroom, which I did not prioritize cleaning for this little impromptu photo shoot.
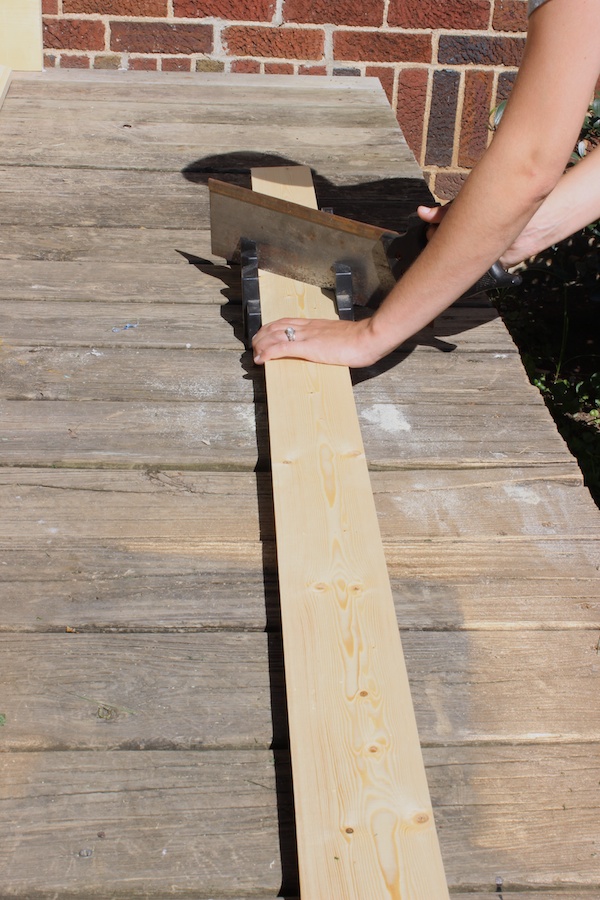
Once the 1x8s were all attached to one another, I measured the finished headboard to determine the size of the frame and cut the 1x4s to size. I used a simple hand saw and miter box to create the 45 degree angles.
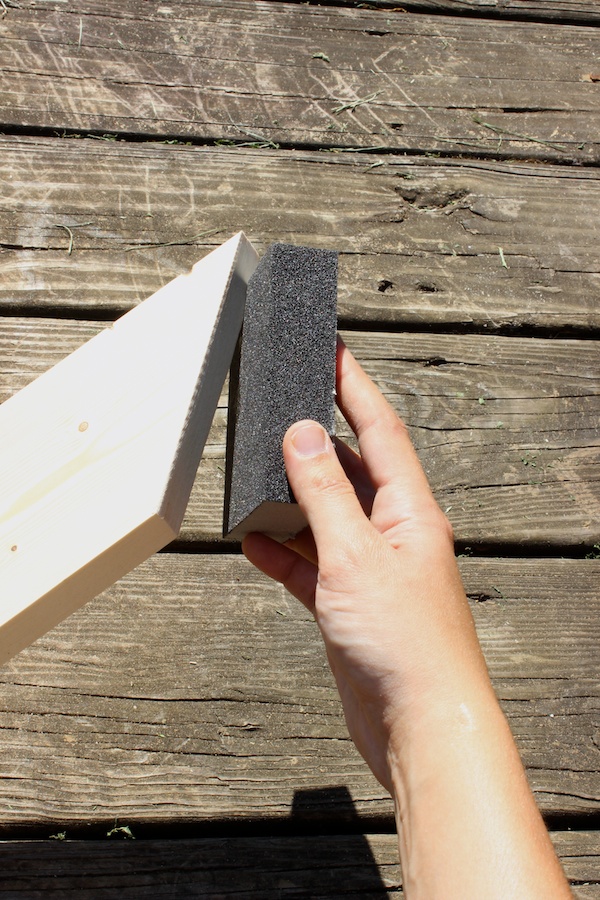
I gave the edges a light sanding.
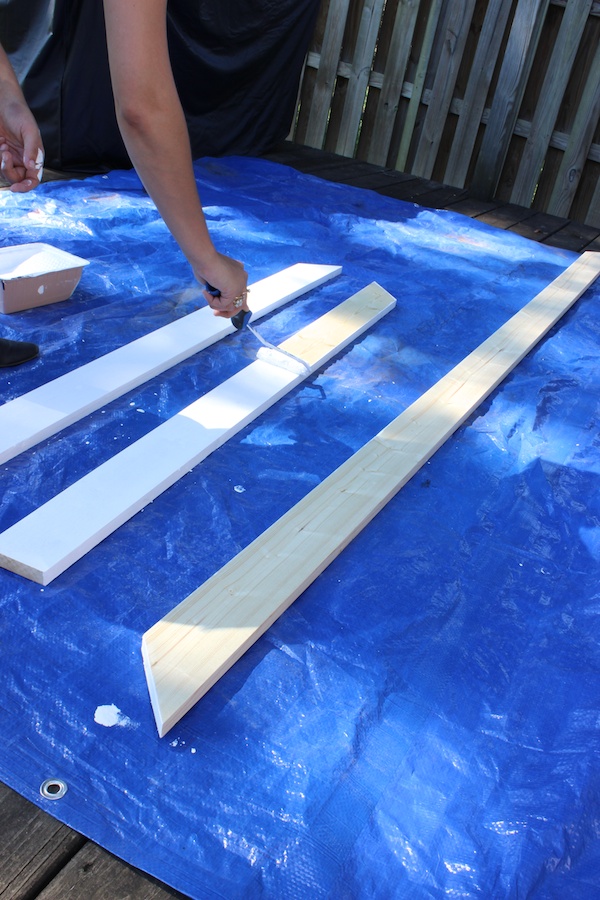
Before assembling the frame, I painted the boards using some extra trim paint that I had around.
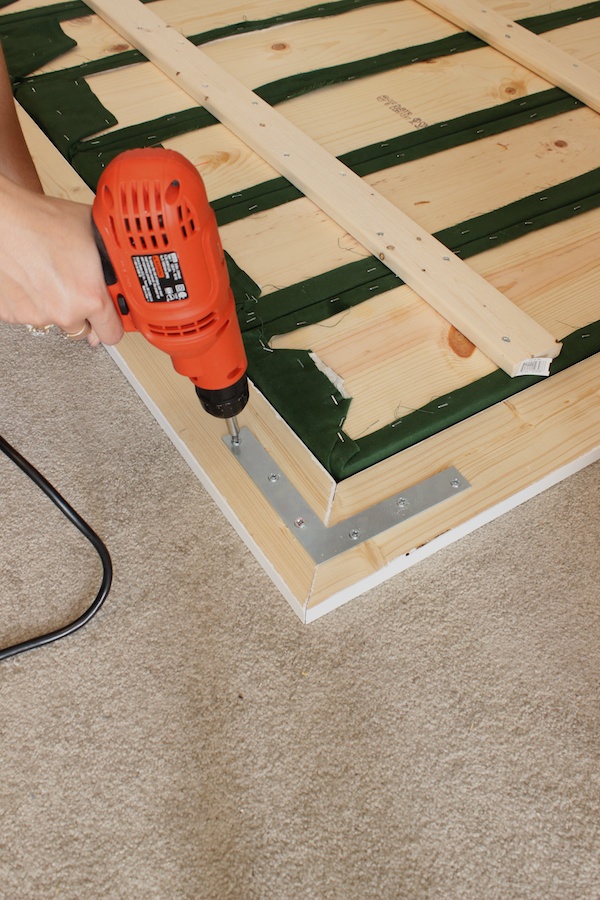
With the frame placed around the headboard, we screwed the frame pieces to one another using L-shaped mending plates.

Finally, we affixed the frame to the headboard using a whole bunch of regular mending plates - 12 total, I believe. Same deal with the screws as earlier...which means these screws needed to be half as long as those we used earlier. Depending on your situation, you may be able to hang the headboard directly onto the wall or affix it somehow to your bed frame. We used L-brackets to affix it to the ceiling.
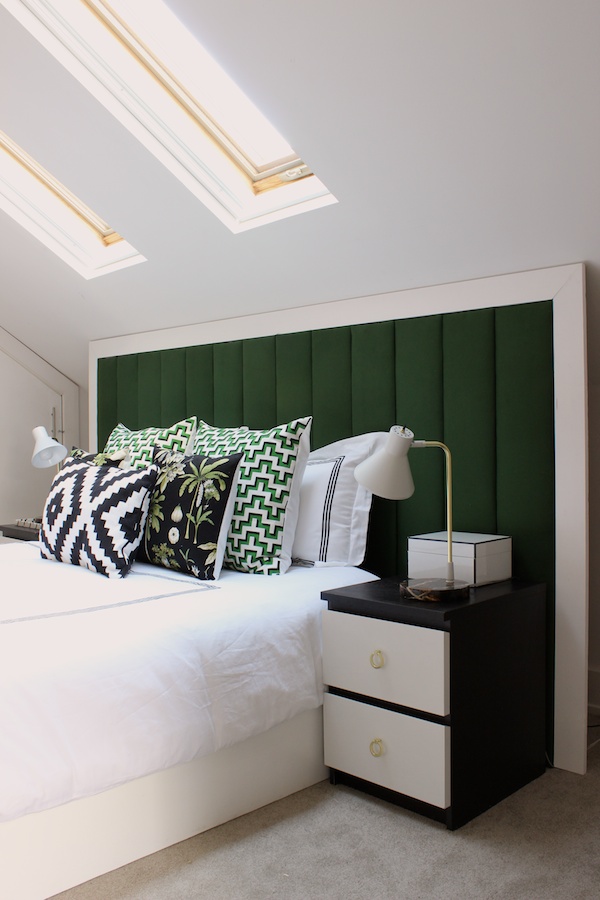
All told, all the supplies - excluding the tools and paint that I already had - came out to just under $200, and I actually had quite a bit of the upholstery fabric left over and the cut-off ends of the 1x8s that I'm looking to use on some random projects here and there. Not the cheapest, bargain-basement project I've ever undertaken, but also not bad at all for a custom headboard that I'm unlikely to ever find in a store. I honestly couldn't be much happier with it, and I think it does the inspiration headboard proud.
It turned out so freakin good! Stacking the upholstered 1x8's is so smart, It would have taken me a while to figure that out!
ReplyDeleteThis is gorgeous! Oh, to not be renter...
ReplyDeletebellissimo!!! bella idea e bel diy!!!
ReplyDeleteNoemi
http://noxcreare.blogspot.it
Um, this (and that kitchen sink) are my favorite parts of your house! I LOVE the color fabric you chose--your bedroom officially looks like a posh European hotel!!!
ReplyDeleteIncredible job Mandy! It's looks amazing an love your choice of color. Thank you so much for sharing and enjoy you stylish bedroom.
ReplyDeleteHello! WONDERFUL job! I'm curious, what are the dimensions of the finished headboard?
ReplyDeleteThanks so much! The finished headboard is about 55.5" tall by 104" long.
DeleteHello, the headboard looks awesome! Please let me know where the green & blue geometric pillowcase is from! They look great! Thank you
ReplyDeleteThanks so much! If you check out my post from Monday, I actually share all of my fabric sources: http://www.fabricpaperglue.com/2013/10/attic-sleeping.html. I hope this helps!
DeleteThis is AWESOME!! Great job!
ReplyDeleteShannon
Fabulously Vintage
This is excellent! I can't wait to try my own version of this!
ReplyDeleteIt looks great. It fits the space and makes such a statement. And I love the color.
ReplyDeleteReally amazing and great work.Nice finishing and you have each and every step easily.our link is Rubber Adhesive Glue
ReplyDeleteThis is by far the best DIY headboard tutorial I've seen. Couple of questions -- Where is the frame for your bed from? It just looks so nice w/ it. And then is that a queen bed or another size? Just trying to get an idea as I love how it fits so well with the end tables and all. Thanks for sharing!
ReplyDeleteWow. Thanks so much, Patty! Great questions. It's a queen bed. The box spring is actually sitting directly on the floor, and we just made a simple frame to go around it from a few 1x12s that we cut to size, painted, and assembled with 4 L-brackets. The whole thing cost maybe $20 to make, excluding paint.
DeleteBeautiful. What would you say was the approximate weight? Any ideas on how to reduce the weight (different types of wood?) Thanks!
ReplyDeleteGosh. I can't even begin to guess. Maybe 50-75 lbs? I'm no wood expert and just bought the cheapest 1x8s the hardware store offered, which (according to my receipt) appear to be whitewood. Based on this chart that I found, whitewood looks to be one of the least dense woods, so I'm not sure how much lighter you'd be able to get it.
DeletePerfect thanks! Just want to check with my landlord about hanging it :)
DeleteAmazing job with the headboard + this post. I'm obsessed with your room color palette too! But I'm mainly curious about your bedding - where did you get it from? It's EXACTLY what I want for my bed. Would love to know! Thanks!
ReplyDeleteAbsolutely! All of the sources for the bedding and the throw pillow fabrics can be found in this post. You'll be happy to know that it was a great deal, too!
DeleteAre you anything like me and lay awake at night thinking and planning how I'm going to execute something like this? I like your "different" headboard, not the standard of what's seen these days with nailheads and curves and my goodness, how easy. Congratulations, looks so clean and neat and professionally done.
ReplyDeleteAbsolutely! I'm constantly distracted by little plans rolling around in my head!
DeleteFound you via this post featured on Apartment Therapy's Top DIY Ideas for the Bedroom 2013. What an honor! I can envision this technique being executed in all kinds of ways. Alternating black and white would be really cool.
ReplyDeleteDo you think it would look okay without the frame? My son has a sloped ceiling like yours and I was wondering about attaching the planks to each other, then hanging the whole thing by D-rings from the wall.
Glad you found me, Hollie! It looked great without a frame! In fact, here's one that might inspire you that's similar but with no frame.
DeleteBeen searching for years for a headboard solution for our guest room that looked better than fabric and batting stretched across plywood. OMG! thank you!
ReplyDeleteThis is really totally awesome. I love how you solved this problem, and that it came out so wonderfully!
ReplyDeleteOK - this is the one for me. Have been looking and saving how to make a bedhead for a few months, but none leaped out at me and made me say 'Wow' - except yours. Thank you.
ReplyDeleteYou are an inspiration. I am now going to reset up my sewing craft area after losing it to my son's study area. Kids didnt need that rumpus room anyway!
ReplyDeleteHi! How could I modify this to be a freestanding headboard instead of screwing it into a wall or hanging from the ceiling?
ReplyDeleteHello, do you remember exactly what size screws you used to attach the 1/8 pieces of wood to the long 1/3?
ReplyDeleteGosh, good question. I think they were like 3/4" -- long enough to go through the 1/3 and into the 1/8 but not so long to go all the way through the 1/8.
DeleteMandy, I love how you did this! I think I want to do something like this in our pitifully boring master bedroom, so I'm so excited that you shared such a detailed tutorial!
ReplyDeleteAlso, I just wanted to drop you a note and let you know that we'll be featuring this over at Remodelaholic on Friday as part of our Headboard Week this week -- we also have a big headboard link party that we'd love to have you come join! You can join the party here -- we're picking our favorites to feature on Saturday: http://www.remodelaholic.com/2014/06/headboard-week/
Thanks! Have a great day!
Lorene @Remodelaholic
Wow, thanks so much!!
DeleteThanks for sharing your detailed instructions, it made making mine SO much easier and I love how it turned out! Finally, I have a headboard I love!! http://avzclubupdate.blogspot.com/2014/07/diy-headboard.html
ReplyDeleteWOW! Thank you so, so much for sharing! It turned out so great! Seriously, I'm beaming that you would use my project as inspiration!!!
DeleteOk, hopefully this is my last question. But when you cut your fabric for the 1/8's, which way did you cut your fabric? Like horizontally or vertically? The fabric I have is 54inches vertically, and I know you said you got your 1/8's cut to 55.5inches but cutting the fabric 4inches wider all around. So I'm just curious how you cut yours. Thank you for all your help.
ReplyDeleteNo problem! My 1/8s were cut to 52" (I think 55.5" was the finished height with the frame), and I cut my fabric 2" bigger all the way around (i.e. 4" wider and 4" taller). My fabric must have been a little wider (maybe 60") so I was able to just cut 11" strips off of it as it came. If you end up with boards taller than 50", you'll probably want to cut off a couple of pieces of fabric that are as long as your needed vertical length and then cut off your 11" strips from that. I hope that makes sense, and good luck!
DeleteOh shucks, that confused me even more. Maybe I'm confusing myself😩. But thanks!! Lol
ReplyDeleteOh no! Don't overthink it. Just cut it however it works.
DeleteLol! So I finally did it!! Talk about a labor of love!! I want to send you pics b/c your post and idea is the reason I decided to make it. But I need to finish decorating it and making my bed fancy. Lol, would you mind if I sent you my finished product?
DeleteABSOLUTELY!!! I want to see it!
DeleteI am not sure if my first comment went through or not (if so please forgive me for re-posting). I just wanted to know if the overall dimensions of this headboard would accommodate a king-sized bed?
ReplyDeleteHi, there. Well, let's see.... The internet tells me that a king-sized mattress is 76", so it seems that the 104" width of my finished headboard would accommodate a king bed plus about 14" on either side. Apparently, a king is about 18" wider than a queen, so if you wanted it to have the same overhang as mine, you'd probably need to add in a couple more upholstered 1x8" boards. I hope this helps!
DeleteYes this is extremely helpful, thank you! Any suggestions if I wanted to make it a few inches taller?
ReplyDeleteSure thing! You'd just want to add some length to the upholstered 1x8s and the two sides of 1x4-frame.
DeleteThanks so much! Looking forward to seeing how this comes out, and seeing more of your ideas. Have a great day!
Delete