
While I am off having adventures in Japan, I have asked some of my friends to help me out by bringing you some fun projects and cocktails. Today's post is from Kim of Sisters of Nature. Enjoy! --Mandy P.
Hello there! I'm Kim Parker from Sisters of Nature. I make handmade stationery, home decor, accessories, clothing, things for weddings, and I just love to make things. I'm so excited to share a DIY craft with you that came out of my obsession with making all things beautiful.
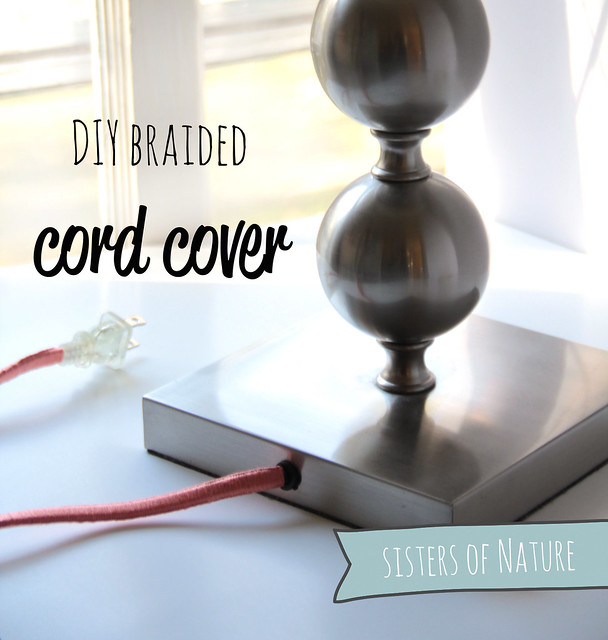
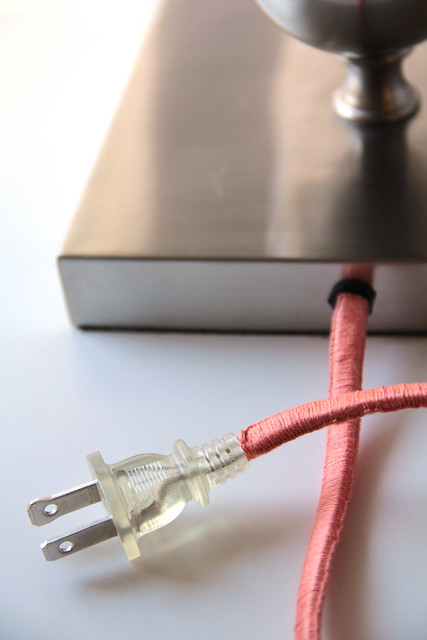
I don't know about you, but I HATE seeing cords! I've tried my best to tuck all of them away out of sight, but sometimes there's just no way to hide them. So I thought I'd come up with a way to make them beautiful. You can use this DIY tutorial on lamp cords, TV cords, extension cords, computer cords, and even phone chargers. Just put on a movie and get to it!
Read on for the full tutorial.
You'll need:
- 1 skeen of yarn
- an extension cord or cord of an electric item
- tweezers
-electrical tape
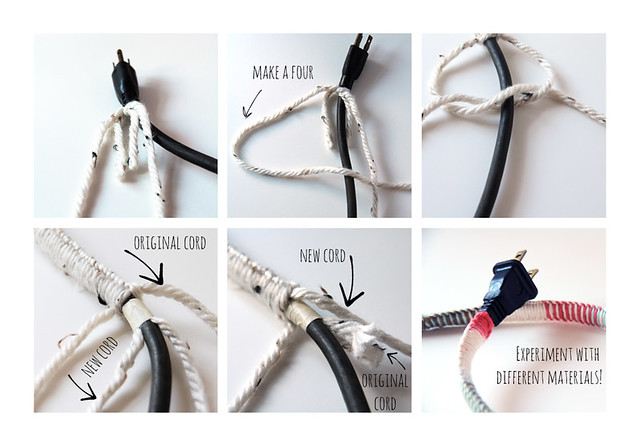
1. Cut two pieces of yarn the length of your arm.
2. Tie a double knot onto the cord with the tails facing away from the plug. Push the knot up flush with the end of the plug.
3. Make a number 4 with the left strand. Place the right strand on top of the part of the "4" that crosses over to the right side.
4. Bring the right strand under the cord and through the loop of the 4.
5. Pull it tight, moving it to the top where you tied the knot. (Keep the tails of the knot flush against the cord so you can braid on top of them and hide them)
6. Keep doing this braid until you have about 6 inches of yarn left. Cut two new strands the length of your arm and tape them flush against the last row you just made. This is how you will add more yarn when you run out. If you can handle working with yarn longer than the length of your arm without tangling it then go for it! You won't have to replenish as often.
7. Now just braid on top of that tape with the original yarn ensuring that you push the braid up as you go along so none of the cord or tape show.
8. Once the strands are too short to braid any more tape them to the cord and use the new strands to braid on top of the original pieces of yarn.
9. Do this pattern all the way until you reach the end of the cord. Tie a double knot and tuck the tails inside the braid with tweezers.
There you have it! I hope you enjoy your lovely new cords as much as I have enjoyed mine.
If you want to check out some of my handmade goods you can visit my website.
xo
Kim

Hello there! I'm Kim Parker from Sisters of Nature. I make handmade stationery, home decor, accessories, clothing, things for weddings, and I just love to make things. I'm so excited to share a DIY craft with you that came out of my obsession with making all things beautiful.
I don't know about you, but I HATE seeing cords! I've tried my best to tuck all of them away out of sight, but sometimes there's just no way to hide them. So I thought I'd come up with a way to make them beautiful. You can use this DIY tutorial on lamp cords, TV cords, extension cords, computer cords, and even phone chargers. Just put on a movie and get to it!
Read on for the full tutorial.
You'll need:
- 1 skeen of yarn
- an extension cord or cord of an electric item
- tweezers
-electrical tape
1. Cut two pieces of yarn the length of your arm.
2. Tie a double knot onto the cord with the tails facing away from the plug. Push the knot up flush with the end of the plug.
3. Make a number 4 with the left strand. Place the right strand on top of the part of the "4" that crosses over to the right side.
4. Bring the right strand under the cord and through the loop of the 4.
5. Pull it tight, moving it to the top where you tied the knot. (Keep the tails of the knot flush against the cord so you can braid on top of them and hide them)
6. Keep doing this braid until you have about 6 inches of yarn left. Cut two new strands the length of your arm and tape them flush against the last row you just made. This is how you will add more yarn when you run out. If you can handle working with yarn longer than the length of your arm without tangling it then go for it! You won't have to replenish as often.
7. Now just braid on top of that tape with the original yarn ensuring that you push the braid up as you go along so none of the cord or tape show.
8. Once the strands are too short to braid any more tape them to the cord and use the new strands to braid on top of the original pieces of yarn.
9. Do this pattern all the way until you reach the end of the cord. Tie a double knot and tuck the tails inside the braid with tweezers.
There you have it! I hope you enjoy your lovely new cords as much as I have enjoyed mine.
If you want to check out some of my handmade goods you can visit my website.
xo
Kim
Very cute!
ReplyDeleteNice idea. I'd like to recommend that you don't use masking tape on any electrical cords though. The only tape you should use on wires is electrical tape.
ReplyDeleteVery prudent advice! I'll make that update now.
DeleteLOVE this idea! We are totally going to do this on a movie night. xo
ReplyDeleteL+J
www.the-glitter-life.com
A video demonstration would be great! :-)
ReplyDeleteWish I was handy enough to do this! I love it!!!!
ReplyDeleteYou have no idea how much I love this....we joke around about my mild OCD and hating cords. This is perfect. My hubstermis a tech geek....you may have saved our marriage! Xxo
ReplyDeleteNice tip, thans!!!
ReplyDeletehttp://beautybubblesinyourlife.blogspot.fr/
Love it- I wrap my cords in embroidery floss, making bright stripes and alternating the colors- the embroidery floss is thin enough I can just tuck the ends in as I change colors. I do mine like this: http://midnightskyfibers.com/wrapped-cords/ for phone cords and the like, it makes it easy to tell them apart from everyone else!
ReplyDelete