The "I Do's" are done, the cake sliced, the rug cut. I am officially married, and I can say that it was the best, most fun thing I have EVER done! Until I have access to more photos, I thought I would share with you this post with some peeks from my photographer Betsy Limbaugh.

9.09.2010
8.24.2010
Step Right Up to the Bar
One of the many joys of getting married is getting stuff. Yeah, yeah, that statement is dripping with consumerism, but it's basically true. Nearly everyday, we arrive home to find a box full of something that we wonder how in the world we ever lived without. For example, how did we live each day without a Flavor Duo Frozen Yogurt, Ice Cream, and Sorbet Maker?! Or this gorgeous stand mixer?

I know that Pete has certainly asked himself how he ever lived without a Pete-sized wonderland of packing peanuts...

Every high has it's low, though, right? The resulting low of our friends' and families' undeserved generosity is our utter lack of space. We've not even walked down the aisle, and we're already stashing kitchenwares on top of the cabinets, in our entryway, in storage. Which leads us to a delightful before and after...
Michael is a bit of a cocktail fanatic, which means prime real estate in our kitchen cabinets is taken up by all varieties of liquors, vermouths, bitters, hard-to-find liqueurs, etc. We've long wanted a bar cabinet for the living room, but felt we lacked the space. As I continued to see the kitchen cabinets fill up and reached the realization that we very, very rarely use the collapsible table bolted to our wall, we determined that if we found a modestly-sized credenza, we could make this happen and free up much-needed space in the kitchen.

I know that Pete has certainly asked himself how he ever lived without a Pete-sized wonderland of packing peanuts...
Every high has it's low, though, right? The resulting low of our friends' and families' undeserved generosity is our utter lack of space. We've not even walked down the aisle, and we're already stashing kitchenwares on top of the cabinets, in our entryway, in storage. Which leads us to a delightful before and after...
Michael is a bit of a cocktail fanatic, which means prime real estate in our kitchen cabinets is taken up by all varieties of liquors, vermouths, bitters, hard-to-find liqueurs, etc. We've long wanted a bar cabinet for the living room, but felt we lacked the space. As I continued to see the kitchen cabinets fill up and reached the realization that we very, very rarely use the collapsible table bolted to our wall, we determined that if we found a modestly-sized credenza, we could make this happen and free up much-needed space in the kitchen.
Rarely-Used Collapsible Table
Once the decision was made, it only took a few days before we found and purchased this perfectly-sized little beaut on Craigslist for $60:


It was in great shape and probably didn't really need anything at all done to it, but it was just too traditional for my taste so I painted it and changed out the hardware. After a weekend of work that included 5 coats of paint and a ruined manicure, here it is today, successfully housing all of our bar needs:


BEFORE
It was in great shape and probably didn't really need anything at all done to it, but it was just too traditional for my taste so I painted it and changed out the hardware. After a weekend of work that included 5 coats of paint and a ruined manicure, here it is today, successfully housing all of our bar needs:
AFTER
8.22.2010
Print, Cut, Punch, Assemble, Repeat
In all the projects that I've undertaken in preparation for the wedding, the one that may ultimately be the most time-consuming is the programs, which is actually quite surprising. Programs seem to be the one wedding item that even the least craft-savvy people DIY for their wedding days. I will admit that I think I have made this task out to be much more complicated than it needed to be. Naturally, I just couldn't settle for your standard book-fold program. I just had to take it the next level....with rounded corners.


Using the same methods I employed for both the save-the-dates and the invitations, I took my inspiration, made it my own, and designed the program in Microsoft Word. What followed (and continues to follow...) is hours of printing, cutting, punching, and assembling, but I honestly think that it's totally worth it. I think they're adorable, and (bonus!) if it's hot, they work as fans!


I began by finding a few programs whose construction intrigued me...
Source: Style Me Pretty
Source: Hello Tenfold via Merriment
Using the same methods I employed for both the save-the-dates and the invitations, I took my inspiration, made it my own, and designed the program in Microsoft Word. What followed (and continues to follow...) is hours of printing, cutting, punching, and assembling, but I honestly think that it's totally worth it. I think they're adorable, and (bonus!) if it's hot, they work as fans!
8.19.2010
Mandatory Accessory
After a longer-than-intended break from blog updates, I hope to be able to say that I am back on the path to more regular posts, but we shall see if I actually hold true to that. Before I jump into my latest projects, I would like to provide a few excuses.
First, it's summer! I love summer, and it always keeps me busy, busy with fun trips, warm weather, etc. And this summer has been particularly full...bachelorette parties, showers, etc.


Michael and I excitedly (/awkwardly) opened gifts at our coed shower in Tennessee in July.
Second, my projects of late have mostly focused on gifts for bridesmaids and groomsmen, so those must remain top secret (with one exception...see below). I was actually reading a little article on The Knot the other day entitled "Wedding Planning Basics: 10 Biggest Wedding Planning Blunders to Avoid." When I reached #7, I just had to laugh: Telling Everyone About Your Wedding. Oops. Oh, well.
Third, our computer has just about pooped out. It is so full that Michael has forbade me from adding any more pictures to the computer, so this has really been a thorn in my blogging side.
Without further ado, there is one bridesmaid gift project that I am able to share prior to the wedding. As I've discussed previously, I have asked each of my bridesmaids to wear a blue dress of their choosing so that they can each express their own sense of style with no stipulations regarding shoes, jewelry, hair, etc. Well, wouldn't you know, my egomania got the better of me, and I decided that I just had to force them to wear something that expresses my sense of style (plus, I just thought it fun/appropriate to make them something to wear since I'm also making the groomsmen something to wear). In the end, I decided that fascinators would be just the thing to infuse a little of me into them.
I had actually originally planned to just buy them fascinators off Etsy, but of course, as I looked around, I kept thinking, "I can make that!" So I did. I ordered some supplies from various Etsy sellers (feathers, buttons, and hair clips), and in what was an almost embarrassingly short amount of time, I whipped up six of these little guys:


First, it's summer! I love summer, and it always keeps me busy, busy with fun trips, warm weather, etc. And this summer has been particularly full...bachelorette parties, showers, etc.
My awesome friends visited me in DC for bachelorette party fun.
I received awesome homewares at my bridal shower in Tennessee in July.
Michael and I excitedly (/awkwardly) opened gifts at our coed shower in Tennessee in July.
Second, my projects of late have mostly focused on gifts for bridesmaids and groomsmen, so those must remain top secret (with one exception...see below). I was actually reading a little article on The Knot the other day entitled "Wedding Planning Basics: 10 Biggest Wedding Planning Blunders to Avoid." When I reached #7, I just had to laugh: Telling Everyone About Your Wedding. Oops. Oh, well.
Third, our computer has just about pooped out. It is so full that Michael has forbade me from adding any more pictures to the computer, so this has really been a thorn in my blogging side.
Without further ado, there is one bridesmaid gift project that I am able to share prior to the wedding. As I've discussed previously, I have asked each of my bridesmaids to wear a blue dress of their choosing so that they can each express their own sense of style with no stipulations regarding shoes, jewelry, hair, etc. Well, wouldn't you know, my egomania got the better of me, and I decided that I just had to force them to wear something that expresses my sense of style (plus, I just thought it fun/appropriate to make them something to wear since I'm also making the groomsmen something to wear). In the end, I decided that fascinators would be just the thing to infuse a little of me into them.
I had actually originally planned to just buy them fascinators off Etsy, but of course, as I looked around, I kept thinking, "I can make that!" So I did. I ordered some supplies from various Etsy sellers (feathers, buttons, and hair clips), and in what was an almost embarrassingly short amount of time, I whipped up six of these little guys:
Don't worry. No surprises have been ruined. I thought it might be a little rude to just pop this mandatory accessory on the ladies the night before the wedding, so I've already shared these pictures with them so that they can think about how they might want to wear their hair.
6.27.2010
Busy Little Bee
There's obviously been some dead air on my blog lately, but that definitely doesn't mean that my hands have been idle. We're about 2 months out from the wedding now, so I've been busy chugging away at all of the projects that I had planned for myself. The following are some highlights of what has been keeping me away from the blog:
Garter
Using a little lace that I ordered from Etsy, some $1 bargain bin blue ribbon, a pair of cheap rhinestone earrings from Charlotte Russe that I deconstructed, elastic, and a little sewing, I threw together a garter for about $10.


Accent Pillows
In what was obviously a non-wedding-related project, I used some remnant blue silk taffeta to throw together a couple of accent pillows.


 Pete was a fan.

Wedding Cake Topper
Little wooden peg dolls seems to be in the in thing in wedding cake toppers these days. There are a handful of Etsy sellers that make personalized ones, chief among them Naked Peggies . They cost somewhere in the neighborhood of $60-$75. Because I love a good trend and it seemed within my realm of artistic abilities, I made one myself. Naked Peggies sells unpainted couples for $3 (or at least she did, as she doesn't seem to anymore), and I picked up a little round wooden box from Michael's for $1 that I used as a pedestal. Otherwise, I just used some acrylic paints that I had around, glitter, wood glue, a tidge of mod podge, and some scrap fabric and ribbon. In all, it cost me maybe $7, and I honestly get a little giddy every time I look at it. In case you're wondering, it's based on dress #2, when I will actually be wearing dress #3 down the aisle. Oh, well.


Invitations
The invitations have really been what has taken up the majority of my time. To anyone thinking of doing their own invitations, I would warn that it takes a lot of time, and while you may convince yourself that you could save 80 or 90% of the cost of ordering them, you're wrong. You will save some money, but it won't be an overwhelming amount, so you should really be in love with your DIY version to make it worth it.
I began by designing them in the same way that I designed the save-the-dates. Then I printed them out on card stock.

I opted to forgo an inner envelope, and instead used some baker's twine (from Etsy seller Whisker Graphics) with a little paper disk to serve the same function of personalizing the invitation.


Using a handy paper cutter, I cut out each invitation, RSVP postcard, accommodations insert, and envelope label.

Then I rounded every corner (because I just had to have rounded corners...)...all like 2,000 of them!

Then, I assembled them.

Finally, I stuffed and addressed them--utilizing a tip that I read somewhere to number the RSVP postcards in case folks mail them back without having written the name in. And yes, addressing wedding invitations is just about as much fun as it sounds like it is.
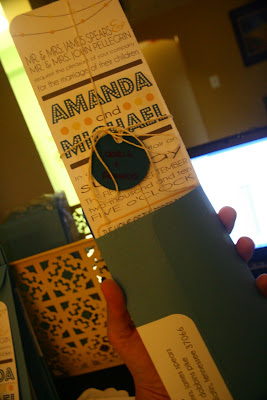


Now, they're all ready to be shipped out this week. So exciting!

Garter
Using a little lace that I ordered from Etsy, some $1 bargain bin blue ribbon, a pair of cheap rhinestone earrings from Charlotte Russe that I deconstructed, elastic, and a little sewing, I threw together a garter for about $10.
Accent Pillows
In what was obviously a non-wedding-related project, I used some remnant blue silk taffeta to throw together a couple of accent pillows.
Wedding Cake Topper
Little wooden peg dolls seems to be in the in thing in wedding cake toppers these days. There are a handful of Etsy sellers that make personalized ones, chief among them Naked Peggies . They cost somewhere in the neighborhood of $60-$75. Because I love a good trend and it seemed within my realm of artistic abilities, I made one myself. Naked Peggies sells unpainted couples for $3 (or at least she did, as she doesn't seem to anymore), and I picked up a little round wooden box from Michael's for $1 that I used as a pedestal. Otherwise, I just used some acrylic paints that I had around, glitter, wood glue, a tidge of mod podge, and some scrap fabric and ribbon. In all, it cost me maybe $7, and I honestly get a little giddy every time I look at it. In case you're wondering, it's based on dress #2, when I will actually be wearing dress #3 down the aisle. Oh, well.
Invitations
The invitations have really been what has taken up the majority of my time. To anyone thinking of doing their own invitations, I would warn that it takes a lot of time, and while you may convince yourself that you could save 80 or 90% of the cost of ordering them, you're wrong. You will save some money, but it won't be an overwhelming amount, so you should really be in love with your DIY version to make it worth it.
I began by designing them in the same way that I designed the save-the-dates. Then I printed them out on card stock.
I opted to forgo an inner envelope, and instead used some baker's twine (from Etsy seller Whisker Graphics) with a little paper disk to serve the same function of personalizing the invitation.
Using a handy paper cutter, I cut out each invitation, RSVP postcard, accommodations insert, and envelope label.
Then I rounded every corner (because I just had to have rounded corners...)...all like 2,000 of them!
Then, I assembled them.
Finally, I stuffed and addressed them--utilizing a tip that I read somewhere to number the RSVP postcards in case folks mail them back without having written the name in. And yes, addressing wedding invitations is just about as much fun as it sounds like it is.
Now, they're all ready to be shipped out this week. So exciting!